Enter your search

Results will be displayed to the left.

Uncategorised

RPPEO Vehicle Procedure

(KIA SEDONA & DODGE CARAVAN)

Please review the RULES and EQUIPMENT before booking a vehicle.

  • Rules

    1. Prior to booking travel confirm the work-related travel is approved by your manager.
    2. If an overnight stay is required during your trip, please complete a TOH travel pre-approval request form. In order to claim expenses resulting from work-related travel it needs to be pre-approved or TOH will not reimburse the expenses.
    3. Prior to taking a vehicle, ensure the vehicle is available to be reserved for the duration of your corporate trip. You can check availability and book a vehicle on our website: www.rppeo.ca located under the “Staff” tab.
    4. On the day of travel ensure you obtain the vehicle key and ESSO gas card from the lock-box in the storage room. It is required to bring the vehicle back with a full tank of unleaded gas as a courtesy to the next driver and to associate gas expenses with your trip.
    5. Obey all traffic laws in the city/township you are in and be courteous toward other drivers. You are a representative of The Ottawa Hospital while operating the company vehicle.
    6. At the beginning of your trip document in the RPPEO Vehicle log in whichever vehicle you will be driving (i.e.- Kia Sedona or Dodge Caravan):
      1. your name,
      2. the purpose of using vehicle,
      3. the date of usage, and
      4. the starting odometer reading.
    7. At the end of your trip when you return the vehicle, document the final odometer reading.
      **It is important to document the starting and final odometer reading related to your trip. We need to document the total distance traveled; items 6 and 7 are requirements of the Canadian Revenue Agency for corporate vehicles.
    8. Ensure you report any indicator lights (on the dashboard) that may be on, or may come on, to your manager.
    9. Perform a visual walk-around inspection of the vehicle before you enter the vehicle at the beginning of your trip, and again at the end of your trip. Report any visual damage or problems with the vehicle immediately to your manager.
    10. In the event there are any restrictions to your ability to drive in Ontario, such as driver’s license suspension or a medical order restricting driving, please report these promptly to your manager.
    11. The Ottawa Hospital no smoking policy applies to all work environments, the vehicle is considered a work environment. There is no smoking in the company vehicles.
    12. Always lock company vehicle doors when not operating the vehicle.
    13. Administrative staff will coordinate vehicle scheduled maintenance appointments.
    14. Do not lease, sell, rent, or lend the company vehicles.
    15. Only RPPEO staff registered under the company insurance plan can drive the vehicles.
    16. Only hands-free operation of smart-phones or telephone devices is permitted in the vehicle. Do not text or use a handheld device while driving.
    17. Bring the vehicle back with a full tank of gas. The Esso gas card will work at any Esso gas station, please plan ahead of your trip to fuel. You will need the driver number (654889), and the current odometer reading (in kilometers) of the vehicle to authorize the card at the pump. When you get to the pump be ready with this information. You need to bring a copy of the receipt to finance for accounting purposes.
    18. Return the vehicle to the designated parking space at the RPPEO office. Return the key and gas card to the lock box when your trip is finished.
    19. Leave all gas receipts on Hannah’s desk for filing and accounting purposes. Notify Hannah of any new receipts as a courtesy.
  • Equipment

    IN BOTH THE KIA SEDONA AND DODGE CARAVAN YOU WILL FIND

    1. 120W cup holder power inverter that allows you to charge iPad, phones, laptops etc.
    2. A safety kit is also in each of the vehicles that includes:
      1. One Year Roadside Assistance Emergency Plan from Canadian Tire Roadside Assistance included
      2. Key components among the 86 pieces include an air compressor, booster cables, tow strap, fleece blanket, and tool kit.
      3. Tool kit contains multi-tool, LED flashlight, (1) D Cell battery, tire gauge, and a 2-in-1 screwdriver
      4. 60-piece first aid kit contains instruction card, (5) towelettes, (10) sterile cotton balls, (40) adhesive strips, 2-piece tape strips, and (2) 2\" x 2\" (5 x 5 cm) gauze pads.
      5. Knit gloves, roll duct tape, emergency poncho, (10) cable ties, window mount reflective triangle, 8' (2.43 m) 8-gauge booster cable CCA, 14' (4.26 m) 4500 lb (2041 lb) capacity tow strap, signal cone and a carrying case.

BY CLICKING THE BUTTON BELOW I ACCEPT THESE TERMS AND PROCEDURES

View Calendar

Request Calendar

Please review the RPPEO Vehicle Request Procedure before booking a vehicle.

Open Calendar

Register to read more …

  • Hits: 829

2025 Fall CME Skill Sheets

These skill sheets can also be found in the Fall Hybrid CME course on MEDICLEARN.

  • Childbirth: Uncomplicated with Nuchal Cord and Placental Delivery

    1. Don appropriate PPE.
    2. Gather all required equipment
    3. Explain procedure and expected outcome to patient.
    4. Obtain consent.
    5. Provide warmth and adequate lighting (as much as possible).
    6. Position the patient supine on a firm surface with her head and shoulders slightly raised, legs flexed and abducted at hips and knees.
    7. Visualize the perineum.
    8. Place plastic sheet/bag/towel/drape under patient’s buttocks.
    9. Observe for rupture of membranes (if not already ruptured) and note colour of fluid if possible.
    10. With non-dominant hand guard the perineum with a 4x4
    11. Deliver the head in a controlled fashion.
      • Apply gentle pressure to vertex (neonate’s head) to control delivery of the head.
    12. Once head is delivered; allow restitution of head to occur naturally.
    13. Observe for nuchal cord
      • If cord is present and loose, slip cord over baby’s head.
      • Only if nuchal cord is tight and cannot be slipped over baby’s head, clamp and cut the cord.
    14. Encourage patient to push with next contraction (or sooner if restitution has occurred and patient ready to push).
    15. Provide gentle lateral flexion, followed by gentle upward flexion to deliver shoulders and body.
    16. Place newborn directly onto the patient’s abdomen, prone with head to the side allowing airway to drain (skin to skin for warmth).
    17. Dry, stimulate newborn, and assess for tone, breathing and crying.
    18. Note the time of delivery.
    19. Cover newborn with new blanket/towel to maintain warmth. (Do not re-use towel/blanket used to dry newborn.)
    20. Allow cord to pulse before clamping and cutting cord (at least 2 minutes) unless neonatal resuscitation is required or multips are known or suspected.
    21. Clamp the umbilical cord in two places approximately 15 cm from the infant’s abdomen and approximately 5 cm apart.
    22. Cut the umbilical cord using sterile (disposable) scissors
    23. Assess for placental detachment.
      Placental Delivery:
    24. Guarding the uterus; place a hand on the lower portion of the abdomen, just above the symphysis pubis in a cupped position (supporting the lower portion of the uterus).
    25. With other hand apply gentle controlled cord traction (working with patient’s contractions) using up and downward motion; when membrane trail is seen; ask patient to cough or laugh and gently tease out membranes in an up and down motion, until completely delivered.
    26. Perform external uterine massage (see procedure list).
    27. Place placenta into provided plastic bag and transport with Mom and newborn. Label bag with patient’s name and document time of delivery.
  • Childbirth Complication: Prolapsed Cord

    1. Don appropriate PPE.
      Gather all required equipment.
    2. Gain consent to inspect perineum for prolapsed cord.
    3. Explain procedure and expected outcome to patient.
    4. Consider extrication strategy.
    5. As soon as possible assist patient into knee-chest position or exaggerated Sims position
    6. Encourage, if cord has not retracted into the patient to breathe through contractions
    7. Keep patient informed of your actions (you will feel me touch you…you will feel pressure etc.).
    8. Gently cradle cord in hand and replace cord into the vagina; insert finger(s)/hand into vagina until you feel presenting part and apply manual digital pressure lifting it off the cord (this will be maintained until transfer of care at hospital. Ideally, do not remove hand until instructed to do so)
  • Childbirth Complication: Shoulder Dystocia

    1. Don appropriate PPE.
    2. Gather all required equipment
    3. Explain Procedure and expected outcome to patient.
    4.  Assess for signs of imminent shoulder dystocia birth.
    5. Inform patient, support person(s) and second paramedic of the emergency situation.
    6. Explain procedure and expected outcome to patient.
    7. Obtain consent.
    8. Position the patient supine on the edge of a firm surface (if possible).
    9. Note time of baby’s head delivered:
      • You have 8 MINUTES to complete delivery from time head is delivered.
    10. Perform ALARM manoeuvers.
    11. If first ALARM unsuccessful:
      • Paramedic partner performs ALARM manoeuvers.
    12. If second ALARM unsuccessful: Transport immediately.
      • Perform ALARM en route to the hospital (as safely as possible).
    13. If successful delivery of baby:
      • Assess and monitor adult patient and newborn for Shoulder Dystocia Delivery complications.
      • Provide newborn care in accordance with the current BLS and ALS PCS.
      • Address complications in accordance with the current BLS and ALS PCS.

    ALARM MANOEUVERS
    Use the following 5 interventions.
    A - Ask for assistance

      1. Ask patient to lay flat, on a firm surface (if not already done).
      2. Ask spouse/family/other healthcare professional to assist during ALARM.\
      3. Ask Paramedic Partner to assist during ALARM.

    L - Legs abduction (MCROBERT’S MANOEUVER)
    Hyperflex hips by lifting legs and knees.
    Aim to:

      1. Bring knees to ears.
      2. Form a squatting position.
        Best performed by 2 people holding legs.

    A - Adduct Shoulder (SUPRAPUBIC PRESSURE)

      1. Apply suprapubic pressure before the next contraction (to be performed by paramedic partner).
      2. Maintain throughout entire contraction.
      3. Instruct the patient to push in this position.
      4. Apply gentle downward lateral flexion of the head.

    R - Roll Over (GASKIN MANOEUVER)
    Perform Gaskin manoeuver (hands and knees).

      1. Ask patient to change position, rolling over onto hands-and-knees position.Apply upward lateral flexion of the baby’s head to facilitate delivery of the body.

    M - Manually release posterior arm.
    If hand visible:

      1. Follow humorous.
      2. Sweep arm across fetal chest and out.
      3. Deliver the posterior arm.
  • Childbirth Complication: Breech Delivery

    1. Don appropriate PPE.
    2. Gather all required equipment
    3. Explain Procedure and expected outcome to patient.
    4. Obtain consent.
    5. Assess for signs of imminent breech birth.
    6. Position the patient to allow gravity to birth the baby.
      • Assist patient into an upright or supported squat position; OR
      • Bring buttocks to edge of bed, place feet on chair (if possible).
    7. Hands off the breech.
    8. Consider manual delivery of legs (if possible/necessary);
      • Apply pressure to the popliteal fossa once visible; AND
      • Gently sweep foot down and out.
    9. Note time baby delivered to umbilicus.
      • You have 4 MINUTES to complete delivery of the head after umbilicus is visible
    10. Consider manual delivery of arms (if possible/necessary);
      • If hand or elbow visible on fetal chest gently sweep hand down and out
    11. Allow baby to descent with gravity.
    12. Hands off the breech.
    13. Another paramedic may apply gentle suprapubic pressure to maintain flexion of the head
    14. Hands off the breech
    15. Initiate Mauriceau-Smellie-Veit (MSV) Maneuver once:
      • Hairline/nape of the neck is visible; OR
      • Head does not deliver within 3 MINUTES after the umbilicus is visible
    16. If head does NOT deliver:
      • Maintain MSV Maneuver and transport.
    17. Once head delivers:
      • Assess and monitor adult patient and newborn for Breech Delivery complications.
      • Provide newborn care as per the current BLS and ALS PCS.
      • Address complications in accordance with BLS and ALS PCS.

    MAURICEAU-SMELLIE-VEIT (MSV) MANOEUVER

    1. Discourage the patient from pushing during the manoeuvre.
    2. Support baby with forearm, palm supporting the chest.
      • Place second and fourth fingers on the malar bones (cheekbones) (not in the mouth).
      • Exert pressure on cheekbones to increase flexion of the neck.
    3. Place other hand on baby’s back
      • Two fingers hooked over the shoulders.
      • Middle finger pushing the occiput to aid flexion.
    4. Once hairline/nape of neck is visible:
      • Lift the body in an arc.
      • Assist the head to pivot around the symphysis pubis.
      • Allow face to delivered.
    5. Ensure controlled delivery of the head.
  • Childbirth Complication: External Uterine Massage

    1. Don appropriate PPE.
    2. Gather all required equipment
    3. Explain procedure and expected outcome to patient.
    4. Obtain consent.
    5. Assist with placental delivery utilizing controlled cord traction when signs of placental separation are observed:
      • Lengthening of the cord;
      • Sudden gush/trickle of blood from vagina with uterine contraction.
    6. Conduct external uterine massage once the placenta has been delivered if the fundus remains soft/’boggy’ or there is continuous bleeding:
      • Place one hand on the lower portion of the abdomen, at the level of the symphysis pubis in a cupped position supporting the lower portion of the uterus.
      • Place one hand at the top of the uterine fundus. The uterus should now be palpable between the hands.
      • Begin massaging with the upper hand using a circular motion. The lower hand should remain still, supporting the lower portion of the uterus.
    7. Continue massaging until post-partum bleeding stops.
    8. If bleeding continues, perform:
      • External bi-manual compression; (see procedure list)
      • Encourage the patient to empty bladder
  • Childbirth Complication: External Bimanual Compression

    1. Don appropriate PPE.
    2. Gather all required equipment
    3. Explain Procedure and expected outcome to patient.
    4. Obtain consent.
    5. If not already performed/attempted:
      • Encourage infant latching/nipple stimulation.
      • Encourage patient to void her bladder.

    Placenta In:

      1. Attempt to deliver the placenta; guarding the uterus use gentle controlled cord traction during contraction with the patient pushing.
      2. If the delivery of the placenta is unsuccessful and patient is exhibiting signs of post-partum hemorrhage; ensure resuscitative measures are in place and perform external bimanual compression as described below.

    External Bi-Manual Compression:

      1. Place one hand on the lower portion of the abdomen, at the level of the symphysis pubis; cup hand, supporting the lower portion of the uterus.
      2. Place the other hand at the top of the uterine fundus. (The uterus should now be palpable between the hands.)
      3. Compress the uterus between each hand continuously compressing the uterus (perform for as long as possible; this may require rotation of providers) until post-partum hemorrhage stops.

    Placenta Out:

      1. Perform external uterine massage (EUM).
      2. If EUM is unsuccessful, perform external bi-manual compression as described above

  • Endotracheal Medication Administration

    PREPARATION:
    If Administering Medication via Syringe - NO Injection Port (includes preloads):

    1. Remove the dust cap of the vial, or use a gauze/ampule cracker to safely crack the
      ampule and dispose of the top into a sharps container.
    2. If using a vial, clean the top of the vial with an alcohol swab.
    3. Attach a blunt tip needle to an appropriately sized syringe.
    4. Fill the syringe to the desired volume, ensuring there is no air in the syringe. Be
      cautious of any medication overflow/spray.
    5. Remove the blunt tip needle and dispose into a sharps container.
    6. If the medication requires dilution, draw up the required amount of saline using an
      aseptic technique with a new blunt-tip needle.
    7. Perform a medication cross-check with your partner, if available.
    8. Dispose of the ampule/vial into a sharps container.

    PROCEDURE:
    If Administering Medication via Syringe - NO Injection Port (includes preloads):

    1. Pre-oxygenate patient.
    2. Remove ventilation adjuncts from ETT.
    3. Inject medication directly into the ETT.
    4. Re-attach ventilation adjuncts and continue with positive pressure ventilation (PPV).
    5. Dispose of the preload or remaining medication into a sharps container.

    If Administering Medication via Syringe - WITH Injection Port (includes preloads):

    1. Continue oxygenation throughout the procedure.
    2. Clean the injection port with an alcohol swab.
    3. Inject medication directly into the injection port.
    4. Dispose of the preload or remaining medication into a sharps container.
  • Pediatric Intraosseous (Manual Technique)

    PREPARATION:

    1. Locate the appropriate site: Proximal tibia site- located approximately 2 cm below the tibial tuberosity on the anteromedial aspect of the leg along the flat aspect of the tibia.
    2. Clean the site with an aseptic technique.
    3. Select the appropriate gauge needle:
      • < 1 year (appropriate gauge as per manufacturer) 18g.
      • > 1 year (appropriate gauge as per manufacturer) 16g.
    4. Stabilize the bone with the non-dominant hand-index finger and thumb on either side of the tibia. In addition, it may be required to place a towel roll or sheet under the knee to assist with stabilization.
    5. As a safety precaution, do not place your hand under the site to stabilize.

    PROCEDURE:

    1. Insert IO at 90 degrees through the skin.
    2. Direct caudally away from the epiphyseal plate, begin a twisting motion with medium pressure.
    3. Stop insertion once a loss of resistance is felt (tactile pop); this signifies the needle is within the marrow.
    4. Remove the stylet and twist down the stabilizer (if needed). The catheter should feel firmly seated in the bone (1st confirmation of proper placement).
    5. Attach the prefilled saline lock (optional) with a 10 ml syringe filled with saline to IO.
    6. Aspirate for bone marrow.
    7. If bone marrow is not aspirated, then attempt confirmation of intraosseous insertion by other means (flushes with no extravasation, IO needle at an appropriate depth, and inserted well into bone).
    8. Flush with 8-10 ml NS in a syringe
    9. Secure IO catheter in place.
    10. Connect the IV set with the pressure infuser.
    11. Fluid administration may be provided under a pressure infuser of 300 mmHg maximum or by a syringe to bolus for a more accurate method.
  • Intraosseous (EZ-IO®) Cannulation

    PROCEDURE:

    1. Don appropriate PPE.
    2. Gather all required equipment
    3. Explain procedure and expected outcome to patient/guardian.
    4. Obtain consent (if possible)
    5. Locate and prep the appropriate site using aseptic technique: As authorized by local Base Hospital.
    6. Select appropriate gauge needle and attach to drill:
      • EZ-IO® 45 mm Needle Set (yellow hub) should be considered for proximal humerus insertion in patients ≥40 kg or patients with excessive tissue over any insertion site.
      • EZ-IO® 25 mm Needle Set (blue hub) should be considered for patients ≥3 kg.
      • EZ-IO®15 mm Needle Set (pink hub) should be considered for patients 3-39 kg.
    7. Attach needle to driver.
    8. Insert needle.

    Proximal Tibia – Adult and Pediatric <12 years of age

    Pediatric:

    1. Landmark anteromedial aspect of tibia, approximately 1 cm medial to the tibial tuberosity, or just below the patella (approximately 1 cm) and slightly medial (approximately 1 cm), along the flat aspect of the tibia
    2. Gently drill, immediately release the trigger when you feel the loss of resistance as the needle set enters the medullary space.
    3. Remove stylet from the catheter in a counter clockwise motion. The catheter should feel firmly seated in the bone (1st confirmation of proper placement).
    4. Dispose of stylet into a sharps container.
    5. Apply stabilizer (if available) over catheter and attach the primed extension to the catheter hub by twisting clockwise.
    6. Aspirate for bone marrow (2nd confirmation of proper placement).
      • If bone marrow is not aspirated then attempt confirmation of intraosseous insertion by other means (flushes with no extravasation, IO needle at appropriate depth, site and inserted well into bone).
    7. Flush the device with 10 ml normal saline checking for extravasation.
    8. If no extravasation, attach primed line and secure arm in place across the abdomen.
    9. Initiate infusion of appropriate fluid/drugs based on patient condition:
      • Use a pressure bag inflated to 300 mmHg for fluid infusion.
      • Discontinue infusion if extravasation occurs.
  • Endotracheal Intubation

    1. Assesses patient, donning appropriate PPE.
    2. Identifies need for treatment. Patient meets indications for treatment under one or more Medical Directives.
      • Airway control AND
      • Other airway management is inadequate or ineffective
    3. Confirms that conditions for treatment are satisfied
      • Lidocaine Spray – orotracheal intubation
      • AND that there are no contraindications to treatment
      • Lidocaine Spray – allergy or sensitivity to lidocaine, unresponsive patient
      • Age <50 years AND current episode of asthma exacerbation AND not in a near cardiac arrest.
    4. Performs airway assessment using: LEMON
      • Look externally (facial trauma, large incisors, beard or moustache and large tongue).
      • Evaluate the 3-3-2 rule (incisor distance < 3 fingerbreadths, hyoid/mental distance < 3 fingerbreadths, thyroid-to-mouth distance < 2 fingerbreadths).
      • Mallampati (mallampati score > 3).
      • Obstruction (presence of any condition that could cause an obstructed airway)
      • Neck mobility (limited neck mobility).
    5. Checks if patient has a gag reflex by oral airway insertion .
    6. Suctions and clears the airway as required.
    7. Pre-oxygenates. BVM with 100% O2 for 30-60 seconds.
    8. Prepares ETT:
      • Chooses appropriate size
      • Checks for cuff leaks (injects maximum volume)
      • Deflates cuff
      • Lubricates distal end of ETT, if required
    9. Precaution: C-Spine.
    10. Inserts the ETT:
      • Pays attention to teeth for trauma
      • Identifies vocal cords
      • Depth of insertion adequate
      • Proper use of B-U-R-P maneuver
    11. Confirms ETT placement using at least 2 primary methods:
      • ETCO2
      • Auscultation
      • AND one secondary method
      • EDD
      • other
    12. Secures Endotracheal tube: SET protocol.
      • Placement / No displacement
      • Tube fixation
      • C-spine collar & Backboard
        • Clear/Plan/Command each patient movement
        • Verification after each patient movement
        • Documentation of ETT confirmation after each patient movement.
    13. Troubleshooting ETT.
      • BVM and transport as initial back-up or after 2 ETT attempts
      • 2 attempts are defined as insertion of the laryngoscope into the mouth

Read more …scenarios2

  • Hits: 3342

Service Forms

  • Certification Request Form

    Paramedic colleges or paramedic service: download and complete this PDF to request the certification of a student or paramedic.

    PDF Download

  • Cross-Certification Referral Form

    Updated April 18, 2023

    For paramedics who would like to request cross-certification in the RPPEO region from another base hospital. Please submit one form for every Regional Base Hospital Program or certifying body within the past 10 years.

    Please download and save this form, then submit by email. 
    Details within the PDF.

    PDF Download

  • Return to Clinical Practice

    Paramedic services anticipating the return to work of a paramedic who has been away for 90 days or more, please complete this form to submit a Return to Clinical Practice request on behalf of the paramedic.

    Online Form

forms

Read more …Service Forms

  • Hits: 9867

Hosted by the Regional Paramedic Program for Eastern Ontario

OHB24 Sponsorship

Join us as a sponsor at 'OBHG24: 15 Years in the Making,' a pivotal event scheduled for September 24 - 26, 2024. This gathering serves as a unique crossroads where industry leaders, healthcare professionals, and experts convene to shape the future of emergency paramedic care in Ontario. Your sponsorship offers a prime opportunity to actively guide discussions, influence strategies, and contribute expertise to chart innovative solutions for Ontario's ever-evolving healthcare landscape. Join this collaborative journey towards person-centered emergency care and be an essential driver in steering the course of emergency paramedic care towards a brighter, more patient-centric future.

We are seeking sponsors who bring diverse expertise and perspectives to OBHG24. Ideal sponsors include organizations or entities well-versed in adult learning, quality management, risk assessment, emergency healthcare, research, technology, or partner engagement within the healthcare sector. Sponsors with a passion for driving innovation, a commitment to person-centered care, and a desire to shape the future of emergency paramedic care in Ontario will find this Annual Meeting a valuable platform to showcase their expertise and contribute to collaborative discussions. Whether you're an industry leader, a healthcare innovator, or an expert in any of these fields, your sponsorship will play a vital role in steering the direction of emergency paramedic care for a more inclusive, resilient, and patient-centric future.


Sponsorship Opportunities

Sponsoring OBHG24offers a unique opportunity to engage with a diverse spectrum of professionals shaping the future of emergency healthcare.

As a sponsor, you'll have exclusive access to Ontario's ambulance system medical directors and base hospital physicians – all emergency physicians - paramedics, and hospital staff from seven major teaching hospitals, including representatives from Ornge, Ontario's air ambulance provider. Sponsors will interact with decision-makers and leaders at the forefront of patient quality & safety, adult continuing medical education, health data management, health and human research, and health communications. This access presents an unparalleled chance to network, collaborate, and forge connections with key influencers and innovators driving transformative change in Ontario's emergency healthcare landscape. Your sponsorship not only showcases your commitment to advancing healthcare but also offers an invaluable platform to engage with thought leaders and decision-makers shaping the future of emergency paramedic care.

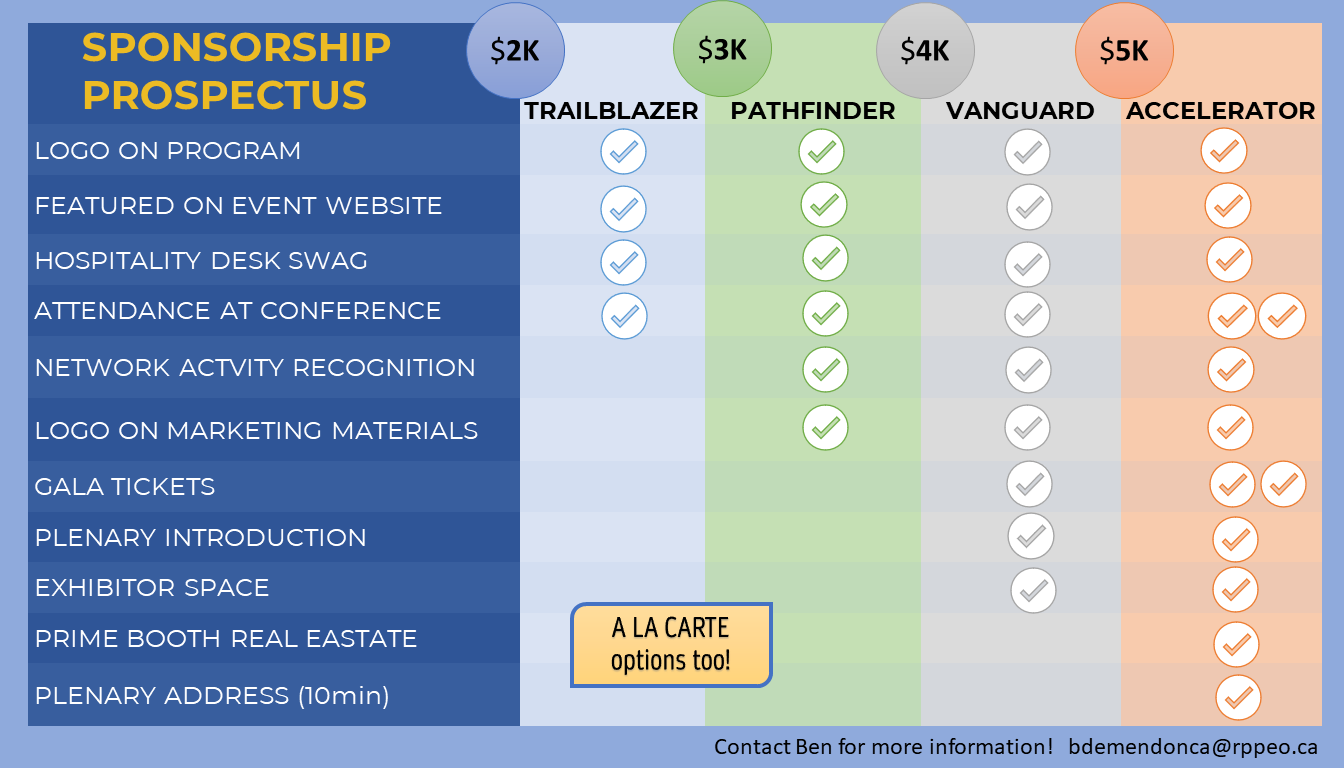
  • Accelerator Level: Positioned as the driving force behind transformative advancements in paramedic care. $5K and up
  • Vanguard Partner: At the forefront, steering the future of emergency healthcare in Ontario. $4K
  • Pathfinder Sponsorship: Pioneering the way forward in shaping innovative strategies for tomorrow's care. $3K
  • Trailblazer Supporter: Leading the charge towards a brighter future in paramedic practices. $2K

Download the OBHG24Sponsorship Proposal as a PDF. 
pdfOBHG24_Sponsorship_Proposal.pdf

Become a Sponsor

View video

Sponsors

Our Sponsors for OHBG24

  • ZOLL Medical Corporation

    Accelerator Sponsor

    ZOLL® is focused on improving outcomes with novel resuscitation and acute critical care technology.

    Visit Zoll

  • Ontario Medical Supply

    Vanguard Sponsor

    Visit OMS

  • Prehos

    Vanguard Sponsor

    Prehos redefines paramedic's time

    Visit Prehos

Read more …Sponsors

  • Hits: 1608
  • Hits: 4
  • ACE TOOL

  • MedicASK Submissions

  • Add Training Event

  • Submit Timesheet

  • Staff Contacts

TOH Links for Staff

  • UKG Time Sheet

    Your online time card. Schedule time off, view your vacation bank, staff schedule and more.

    Read more

  • TOH Citrix Workspace

    Access the following applications on the TOH Network:

    • HRIS
    • ELM
    • Remote Desktop

    Open Citrix

  • TOH Sharepoint

    Files and resources

    Go to Sharepoint

  • TOH Service Now

    To create a support request send an email to servicenow@toh.ca

    Email support

The Team


RPPEO News Hub

RPPEO New has moved to Sharepoint. With so many of our work tools already in Office Online, the integrations possible with SharePoint make it easy and secure as our news tool. We hope you'll enjoy getting the news here!

Visit Sharepoint

Vehicle Reservations

Book Now

Read more …Staff Portal

  • Hits: 2680

Standards

Regional Paramedic Practice Standards

Certain approved programs in our area may publish additional guidance for the safety and quality of care of the patients who benefit from the program. Examples of these regional programs include stroke or trauma bypass and the Paramedics Providing Palliative Care program. The RPPEO partners with the groups who lead these initiatives to help inform their processes. The responsibility to monitor and update these standards rests with the organizations who lead these programs. For this reason, the RPPEO does not re-publish regional or local program documents.

The RPPEO publishes policies for paramedics to use in their clinical work and professional certifications. Our policies help paramedics understand what is expected in terms of process, timing, reporting, documentation and other rights and responsibilites.

RPPEO Policies

Provincial Paramedic Practice Standards

Ontario provicial standards set the expectations for paramedic clinical practice. They are provincially developed and maintained through the Ontario Base Hospital - Medical Advisory Group and approved by the Ministry of Health's Director of the Emergency Health Regulatory and Accountability Branch (EHRAB). Paramedics across Ontario are expected to provide clinical care by following these standards:

Read more …Standards

  • Hits: 11495